Cloud ERP by Business Layers
Product Tree Guide - BOM
Guide for the site admin: how to build a BOM from folders and items, set quantities, view product cost, and print it.
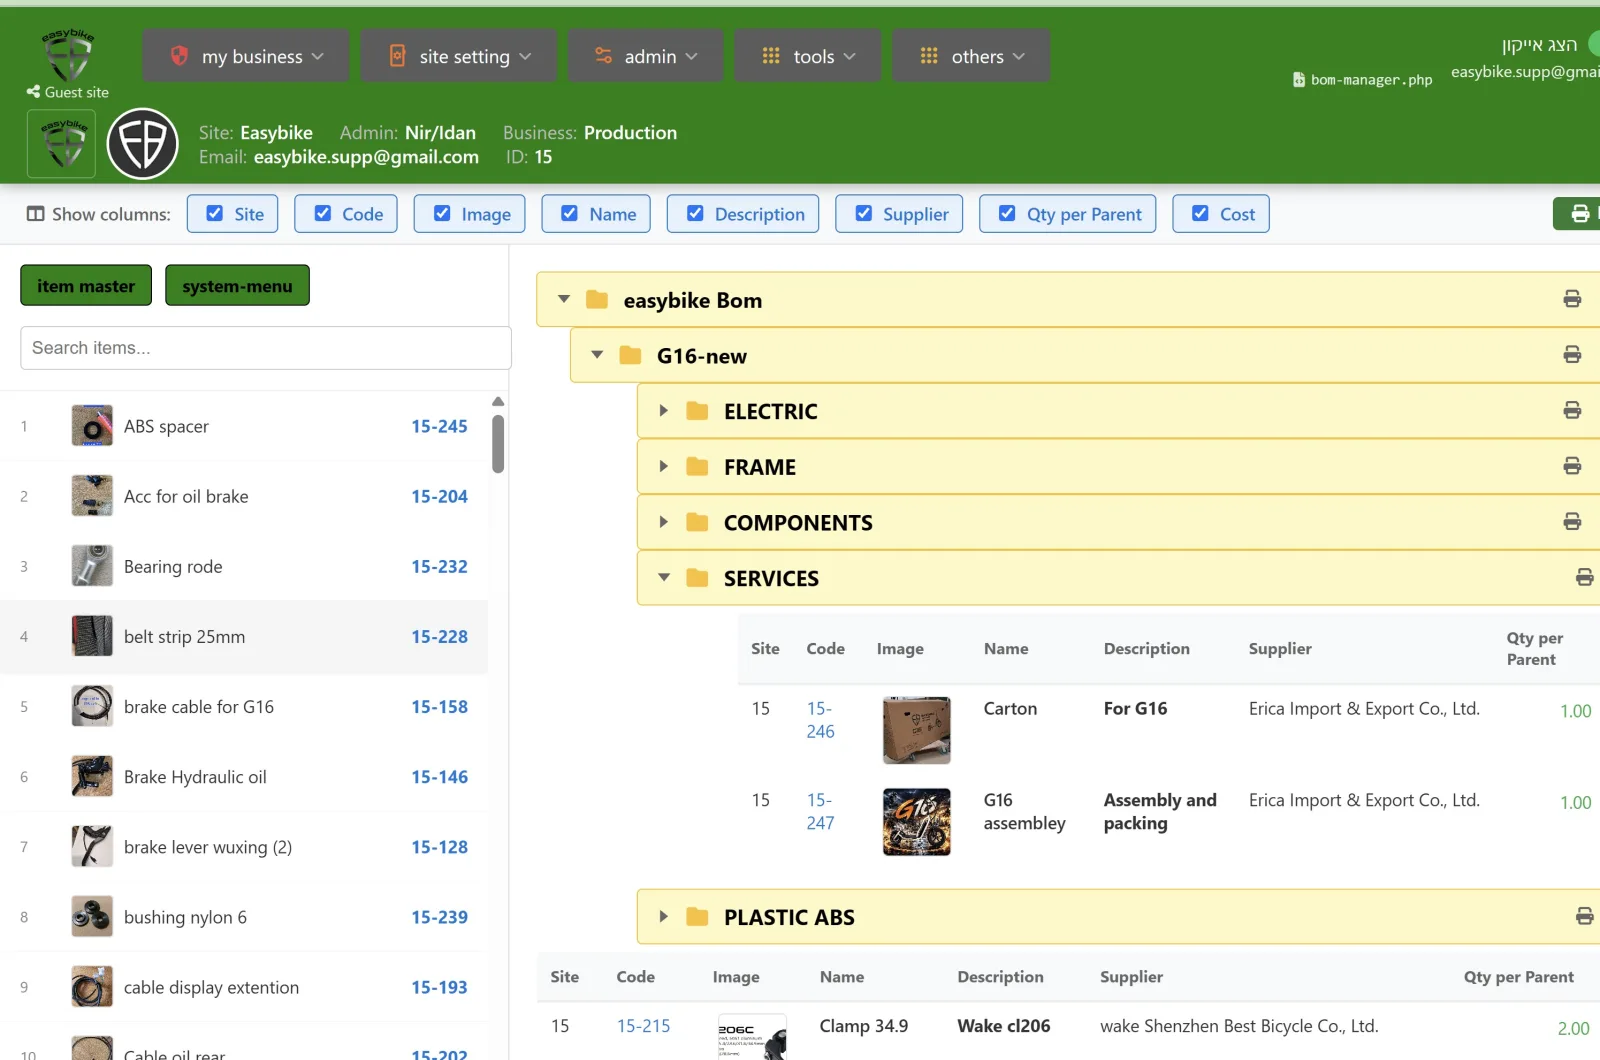
What the Product Tree Screen Does
The Product Tree (BOM - Bill of Materials) describes what each product is made of: the assemblies, the parts in each assembly, and the quantity of each part. The structure is built from folders - one folder for the product, with folders for assemblies inside it - and an item table in each folder.
The system calculates a cumulative cost for each folder: the cost of its items multiplied by their quantities, plus the cost of all subfolders. This lets you immediately see the cost of an assembly and the total product cost.
Benefits of Product Tree Management
- Multi-level product structure - product, assemblies, and subassemblies, with unlimited depth.
- Add components by dragging them from the list of all business items.
- Quantity for each component, with direct updates in the table.
- Cumulative cost for each folder, calculated from the item costs in the item card.
- Supplier, image, and description for each component - without leaving the screen.
- Show and hide columns, and sort the table by any column.
- Print the entire tree or a single folder.
Screen Sections
- Top Bar
- Site details: logo, site name, admin, business type, email, and site number.
- Column Row
- Show and hide columns in item tables, and use the Print HTML button to print the entire tree.
- Item List (Right)
- All business items, with search by name. An item already in the tree is highlighted in light green. Clicking the name opens the item's media, and clicking the code opens the item card. Links to the item master and system menu appear at the top of the list.
- Tree Area
- Folders are displayed as yellow bars with the cumulative cost in red. Clicking a bar opens or closes the folder, and the system remembers which folders were open.
How to Build a Product Tree, Step by Step
Open the Product Tree Screen
On first entry, the system automatically creates a root folder. The entire structure is built under it.
Create a Folder for the Product
Right-click a folder, select Add child folder, and enter a name, such as the model name. Right-click an empty area and select Add Root Folder to create a top-level folder.
Add Subassemblies
Within the product folder, create folders for assemblies, such as chassis, electrical, and wheels. Add sibling folder creates another folder at the same level.
Drag items into a folder
Search for an item in the list on the right and drag it to the folder bar. The item is added with quantity 1.
Update quantity
Click the quantity in the item row, type, and press Enter. Esc cancels. You can also right-click -> Update Quantity.
Organize the structure
Drag a folder or item to another folder to move it. Dragging to an empty area moves it to the top level.
Check the cost
The accumulated cost of everything inside each folder, including subfolders, is shown in red next to it.
Print
Print HTML prints the entire tree; the printer icon in the folder bar prints only that folder. Hidden columns will not be printed.
Right-click actions
- On a folder
- Add child folder - New folder inside it. Add sibling folder - New folder beside it. Rename - Change the name. Delete - Delete the folder.
- On an item
- Update Quantity - Change the quantity. Remove out from folder - Remove the item from the folder. The item itself is not deleted from the system.
- On an empty area
- Add Root Folder - New folder at the top level.
Item table columns
- Site
- The site number to which the item belongs.
- Code
- Item SKU. Clicking it opens the item card in a new tab.
- Image
- Item image. Clicking it enlarges it.
- Name
- Item name. Clicking it opens the item card.
- Description
- Full description from the item card.
- Supplier
- Suppliers linked to the item in the item card.
- Qty per Parent
- Number of item units in the folder. Clicking allows you to update it.
- Cost
- Item cost multiplied by quantity.
Clicking a column header sorts the table by it; clicking again reverses the order.
Programs related to the product tree
- Item card
- The item code, name, description, and cost of each component are defined here. A cost updated on the item card changes the cost in the tree.
- Item media
- Item images and files — opened by clicking the item name in the list.
- Print product tree
- The print page opened from Print HTML or the folder's printer icon.
Tips for working correctly with a product tree
- Use one folder per product, with a folder for each assembly inside it — this shows the cost of each assembly separately.
- Before you start, make sure every item has a cost on its item card. An item without a cost is counted as 0.
- Use the list search, and pay attention to the color: a white item has not yet been assigned to any product.
- Folders are deleted immediately, without a confirmation prompt — double-check before clicking Delete.
- Hide unnecessary columns before printing to get a clean page.
Frequently asked questions about the product tree (BOM)
What is a product tree (BOM)?
An organized list of all parts that make up a product, divided into assemblies, with the quantity of each part. The product cost is calculated from the tree.
How is a folder's cost calculated?
The cost of each item (from its item card) multiplied by its quantity, plus the cost of all subfolders multiplied by the quantity of each subfolder.
Why is an item in the list colored green?
Light green indicates an item that is already included in the product tree at least once. Items not yet assigned appear first in the list.
How do I change an item's cost?
The cost is taken from the item card. Click the item's code or name, update the cost on the card, and refresh the product tree.
Can the same item be added to multiple products?
Yes. Drag the item to every folder where it is needed. It has its own quantity in each location.
Why have the columns I hid reappeared?
The selection is saved in the browser. You must select them again in a different browser or on another computer.