Cloud ERP by Business Layers
Service Scheduling Guide — Business Calendar and Customer Self-Booking
Guide for the Site Admin: Set up locations, hours and purposes, manage the calendar, and send customers a self-booking link.
What the Appointment Scheduling System Does
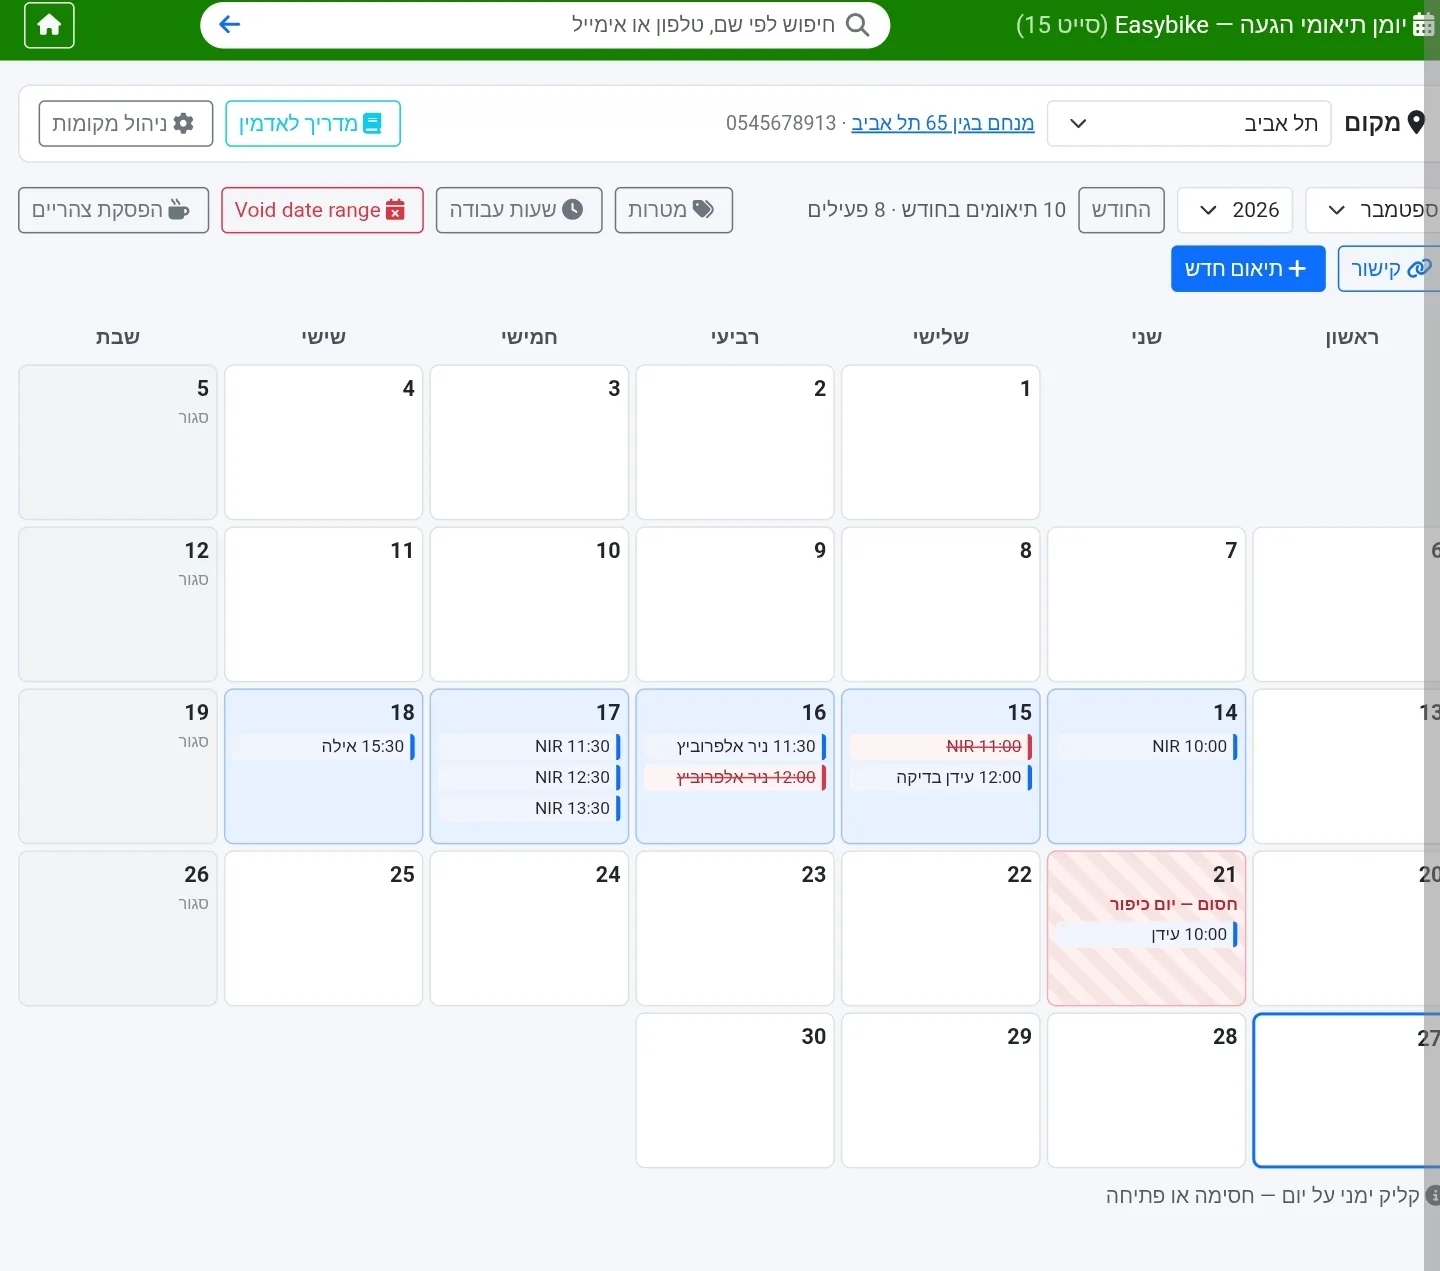
The appointment scheduling system has two parts that work together. The admin calendar (queue_admin.php) is where you set up locations, appointment purposes, business hours, breaks, and blocks, and view all appointments in month and day views.
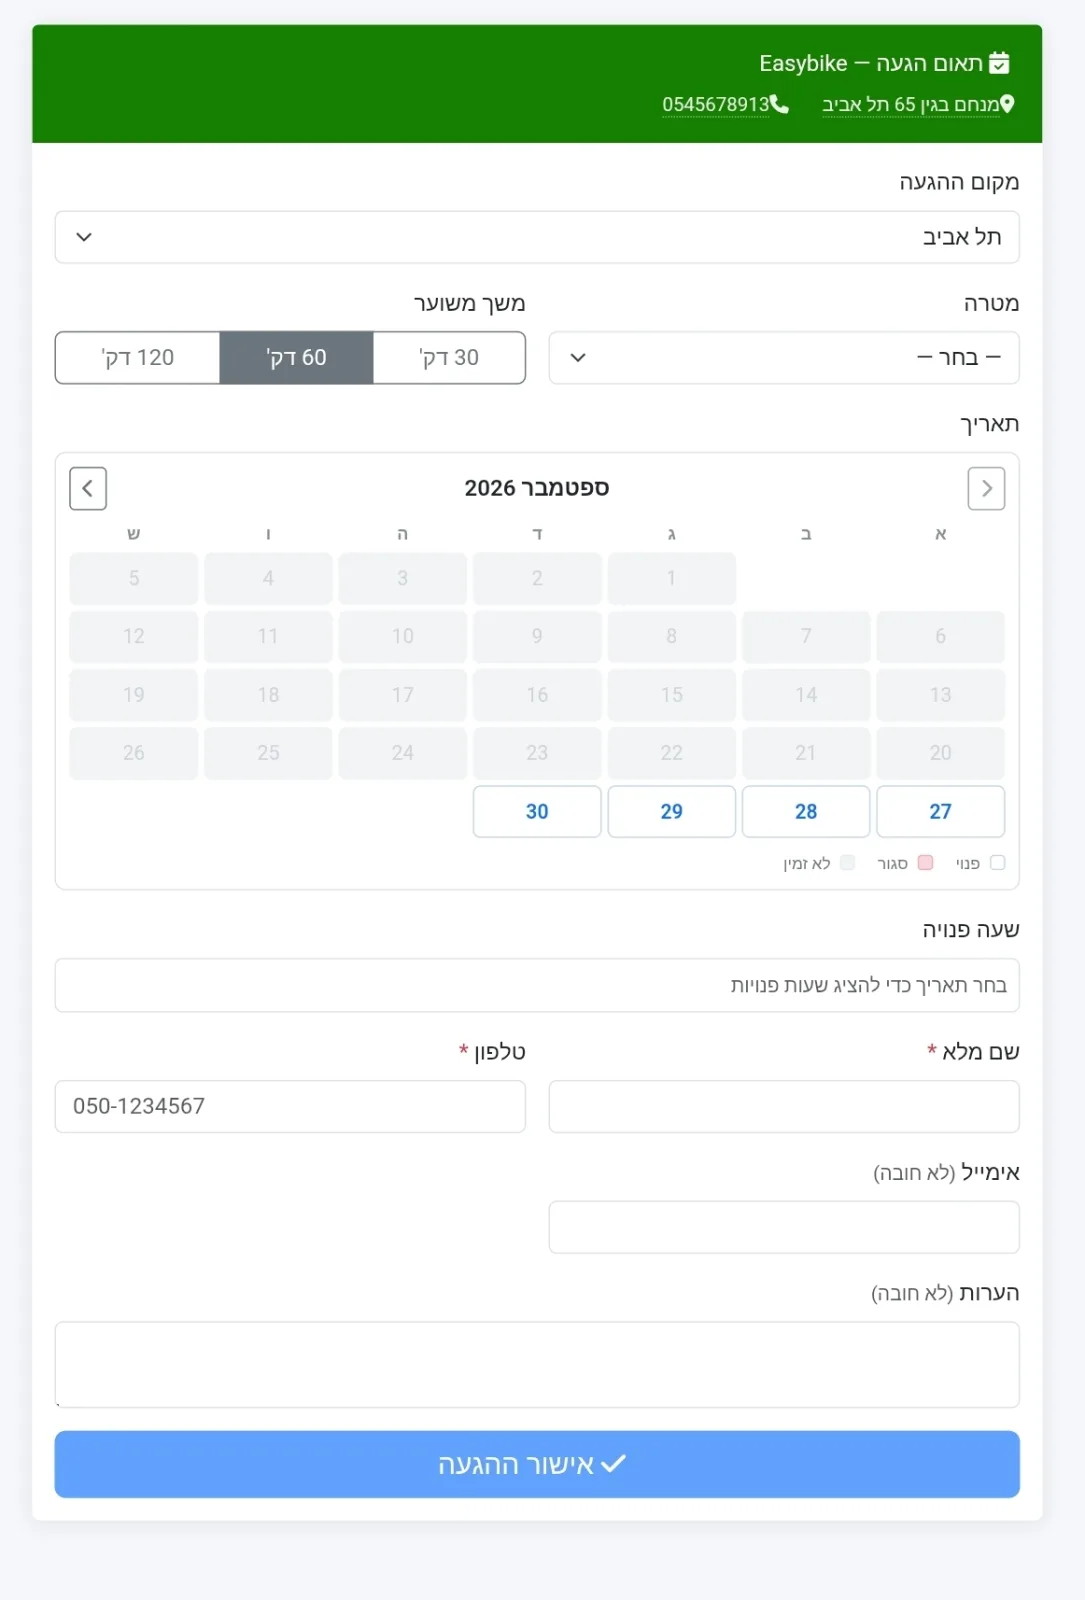
The appointment scheduling page (appt_book.php) is the public page you send to customers. Customers choose a location, purpose, available date and time, and enter their name and phone number - the appointment is added to the calendar immediately. They receive a confirmation email with a cancellation link and can send themselves a WhatsApp reminder.
What You Get with the Appointment Calendar
- A separate calendar for each location, with its own business hours, lunch break, and blocks.
- Customer self-booking page - shows only genuinely available times.
- Block a day, date range, or single half-hour - with one click.
- Automatic confirmation email to the customer and business, with a cancellation button.
- WhatsApp reminder ready to send from any appointment.
- Smart search by name, phone, or email - across all locations.
- Status for each appointment: Scheduled, Completed, No-show, Canceled.
Appointment Statuses
ScheduledActive appointmentReserves the time slot in the calendar, so it is not offered to other customers.CompletedThe customer arrivedThe appointment took place. Marked in green.No-showNo showThe customer did not arrive. Marked in red.CanceledCanceled appointmentDisplayed with strikethrough, and the time becomes available again.Only appointments with the "Scheduled" status reserve the time slot. When a customer cancels through the email link, the time is released in the calendar.
How to Set Up and Manage Appointments, Step by Step
Set Up Locations
In the calendar, click "Manage locations" and add a name, address, phone number, and map link. A removed location is not deleted but deactivated—its appointments are preserved.
Set visit purposes
"Purposes" — the purpose name and estimated duration (30, 60, or 120 minutes). When the customer selects a purpose, the duration is selected automatically.
Set working hours
"Working hours" — for each day of the week: closed, or from one time to another. Hours are saved separately for each location.
Set a lunch break
"Lunch break" — enable it and set the hours. Customers will not be offered appointments during these hours.
Send the link to customers
"Link" copies the URL of the visit scheduling page. Send it via WhatsApp, your website, or social media.
The customer schedules a visit
On the public page, the customer selects a location, purpose and duration, a date from the calendar, and an available time, enters their name and phone number, and clicks "Confirm visit". They receive a reference number and confirmation email.
View the calendar
The monthly view displays appointments for each day. Clicking a day opens a daily calendar in 30-minute intervals, from 07:00 to 20:00.
Add an appointment manually
Click an "Available" slot in the daily calendar, or "New appointment", and enter the location, date, time, purpose, and customer details.
Manage an appointment
Clicking an appointment opens its details: send a WhatsApp reminder, change its status, edit details, or delete it.
Block times
Right-click a day in the monthly view to block it with a reason, or block all locations. "Void date range" blocks a range of days. In the daily calendar, "Blocked" blocks one 30-minute slot.
Search for a customer
Enter a name, phone number, or email in the top search bar. Results are grouped by day, and clicking one takes you directly to the day with the appointment highlighted.
Visit appointment fields
- Location
- The location where the appointment takes place. Each location has its own calendar.
- Date and time
- The visit time. Customers see only available times, at least two hours ahead and up to 60 days in advance.
- Purpose and duration
- The reason for the visit and a duration of 30, 60, or 120 minutes. When editing, any duration between 5 and 720 minutes is allowed.
- Name and phone number
- Required. The phone number must be in Israeli format, for example 050-1234567.
- Optional. If filled in, the confirmation email is sent to the customer, with a copy to the business.
- Notes
- Additional information from the customer or admin.
- Status
- Scheduled, completed, no-show, or canceled.
Programs related to appointment scheduling
appt_book.phpPublic appointment scheduling page — the link sent to customers.
appt_cancel.phpCustomer cancellation — via the link in the email and reminder.
queue_admin_guide.phpAdmin guide — opened using the "Admin guide" button in the calendar.
Tips for managing the appointment calendar
- Before sending the link to customers, set at least one location and one purpose — without them, the public page displays "Not currently available".
- Block vacation or reserve duty using "Void date range", and select "All locations" if needed.
- Blocking a date range does not cancel existing appointments — review and handle them manually.
- Send a WhatsApp reminder the day before — it includes the address, map, and cancellation link.
- Mark each appointment as "Completed" or "No-show" — this shows who comes and who does not.
FAQs about appointment scheduling and the appointment calendar
How does the customer schedule an appointment?
Send them the link using the "Link" button in the calendar. They select a purpose, available date and time, enter their name and phone number, and confirm.
How do I block a day off?
In the month view, right-click the day and select "Block here". For multiple days, select "Void date range".
How do I block just one hour?
In the daily calendar, click "Block" in the strip for that half-hour. "Available" removes the block.
What happens when a customer cancels?
The link in the email and reminder cancels the appointment, and the time becomes available again.
How do I send a reminder to a customer?
Open the appointment in the calendar and click "Send WhatsApp reminder" — the message is prepared with all the details.
Can I change an existing appointment?
Yes. Open the appointment, click "Edit details", and make the changes. If there is a conflict, the conflicting appointments are shown and you can save anyway.
Why can't the customer see a specific time?
The time slot is booked, blocked, during lunch break, outside working hours, or less than two hours from now.
How do I find a customer's appointment?
Enter a name, phone number, or email in the top search. Click a result to go to its date.